Introduction
This is the third part of the RedmineStudio settings guide.
The settings guide is organized by tabs in the settings screen.
This article covers the following settings:
- Schedule Items
- Issue List
Settings
Important settings are marked with “*”.
Schedule Items
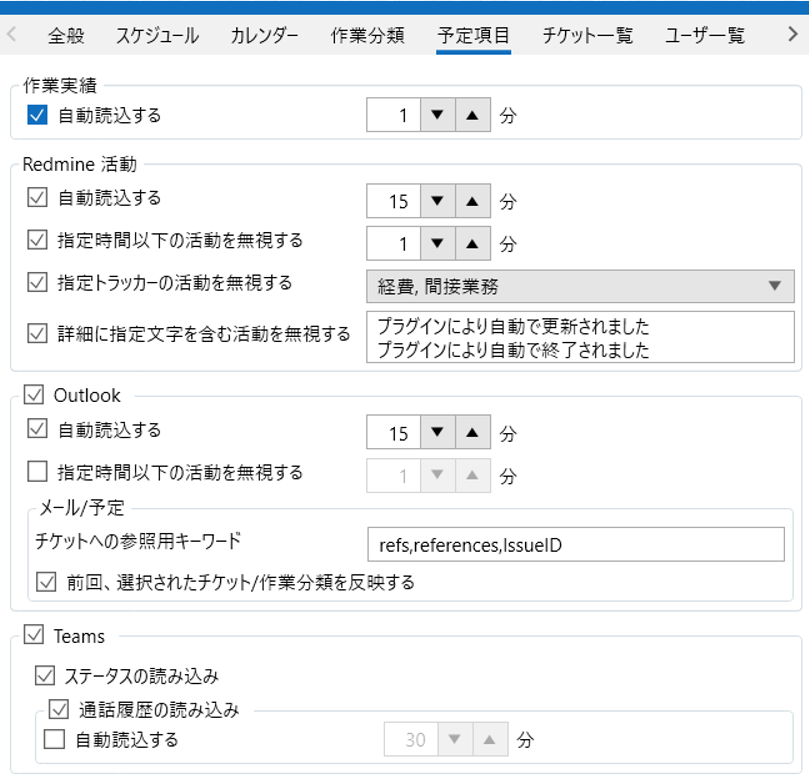
Work Records
- Auto Load*
Set “Enable/Disable” and “Interval” for auto-loading work records.
When configured, updates will be performed automatically.
Redmine Activity
- Auto Load*
Set “Enable/Disable” and “Interval” for auto-loading Redmine activity.
- Ignore Activities Under Specified Time
Enabling this setting allows you to suppress the display of consecutive Redmine activities. Specify “Enable/Disable” and the “Time” to ignore. For example, if you set 5 minutes and enable this setting, even if activities are recorded consecutively within 5 minutes, only the first one will be displayed. Enable this setting if you find it bothersome when multiple activity histories appear at the same time, such as when editing issues in bulk.
- Ignore Activities of Specified Tracker
Enabling this setting will hide activities of the specified trackers. Specify “Enable/Disable” and the “Trackers” to ignore. Multiple trackers can be specified.
- Ignore Activities Containing Specified Text in Details
Enabling this setting will hide activities containing the specified text. Specify “Enable/Disable” and the “Text” to use for determination. By using this setting, for example, you can combine it with a plugin that automatically updates issues with specific comments, and ignore updates made by the plugin. You can also set multiple strings by using line breaks.
Outlook
Set whether to use the Outlook integration feature with the checkbox on the left of the item.
If you change this setting, you need to restart the app to apply it.
If you don’t use Outlook integration, uncheck the box and the settings below are not required.
- Auto Load*
Set “Enable/Disable” and “Interval” for auto-loading Outlook.
- Ignore Activities Under Specified Time
Enabling this setting allows you to suppress the display of consecutive Outlook activities. Specify “Enable/Disable” and the “Time” to ignore. This setting is similar to “Ignore Activities Under Specified Time” for Redmine Activity.
- Keyword for Issue Reference
Set a keyword for obtaining issue references from email or event content. For example, if “refs” is set as the keyword and there is a description “refs #1269” in the event content, issue #1269 will be automatically linked when you add that event as a work record.
- Apply Previously Selected Issue/Activity Category
Enabling this setting allows you to automatically apply the previously set issue and activity category when an event with the same subject as a past time entry is selected. For example, suppose you assigned issue #1269 to an event called “TL Regular Meeting” and set the activity category to “Meeting”. With this setting enabled, the next time you add an event called “TL Regular Meeting” as a work record, #1269 and “Meeting” will be automatically set.
Teams
Set whether to use the Teams integration feature with the checkbox on the left of the item.
If you change this setting, you need to restart the app to apply it.
If you don’t use Teams integration, uncheck the box and the settings below are not required.
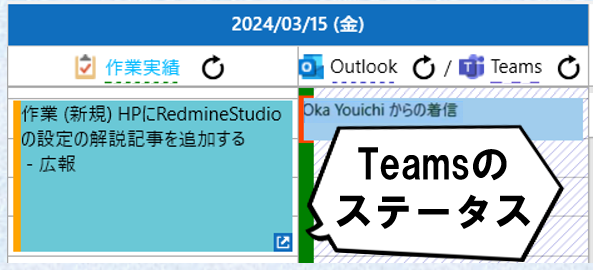
- Load Status*
Set “Enable/Disable” for loading Teams status. When enabled, the status is displayed as shown below. Green indicates “Available”, yellow indicates “Away”, and red indicates “In a call”.
- Load Call History*
Enabling this setting will display the history of calls and meetings made in Teams.
- Auto Load
Set “Enable/Disable” and “Interval” for auto-loading Teams call history.
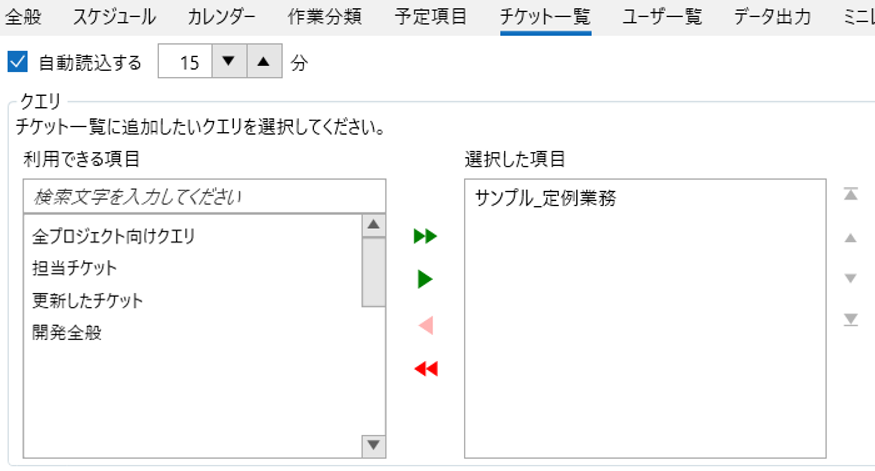
Issue List
Configure what to display in the issue list at the bottom of the input screen.
All queries are displayed in the left list. From there, use the “▶” button to add items you want to display in the issue list to the right list. Items added to the right list will be displayed on the input screen.
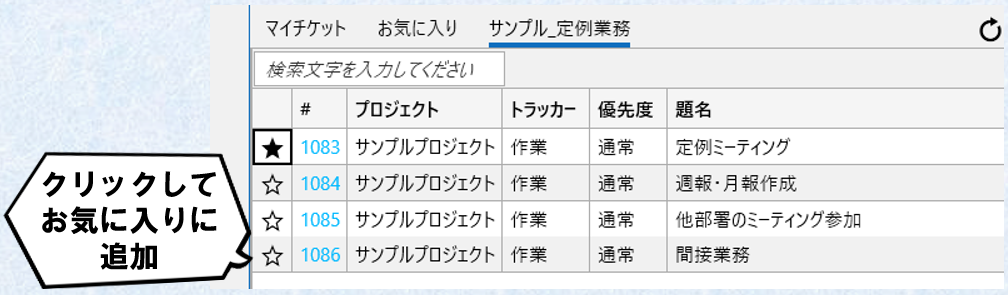
With the above settings, it will be displayed as follows.
In this example, the custom query “Sample_Regular Tasks” is a query that “retrieves all issues under the parent issue for regular tasks”, resulting in this display.
Also, My Issues (list of issues assigned to you) and Favorites are displayed by default. You can add to Favorites by clicking the “☆” on the far left. Issues with “★” are already added to Favorites.
- Auto Load
Set “Enable/Disable” and “Interval” for auto-loading the issue list.
You can also update the list by clicking the “” button on the right.
Conclusion
This concludes the third part of the RedmineStudio settings guide.
For other settings, please see the following links: